How to apply New Pancard and Minor Pan Card in UTI Full Process
How to apply New Pancard and Minor Pan Card in UTI Full Process Digi Seva Pay
How to apply New Pancard and Minor Pan Card in UTI Full Process
Click here to watch pan card training videos ←←
new pan card apply for major and minor pan card apply is very easy and very simple process in digi seva pay csp point.
you need to follow 3 steps mainly like preform entry,main form entry,upload documents and generate batch.
then the pan card will be dispatched in 7 days to customer address and pdf pan card will be generate in 2 days after successful process. for your understanding we are providing complete steps to apply easily so read and apply step by step as given in 10 minutes.before apply the pan card you should have a coupon for applying the pan card.
the steps followed as below mentioned:
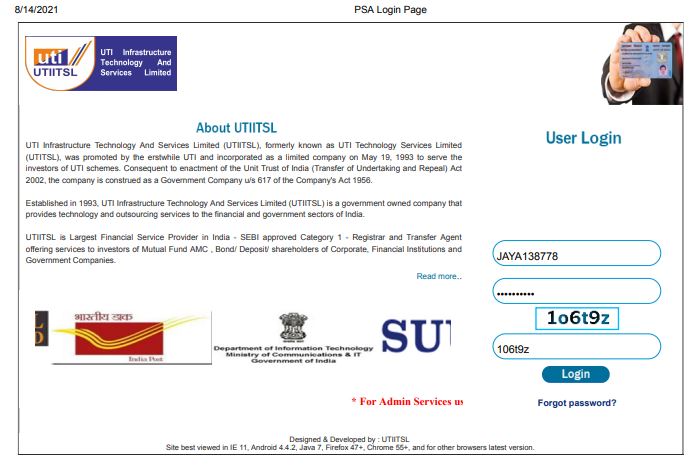
- Visit our Website https://www.digisevapay.co.in
- Click on Recharge&Pan Login
- if you are first time login click on join now and enter all details and you will get username and password to your mail id.
- then click on Login (Username will be your phone number)
- Note: Now no coupon system. click on instant add money and scan the qr code then money will be added to pan wallet.
- Note: Min wallet recharge acceptable 500 only
- You can do Both Recharges and pan card apply with wallet amouns
- Remaining process you can watch our pan card training videos and follow the steps accordingly simple way
- Click here to watch training videos.
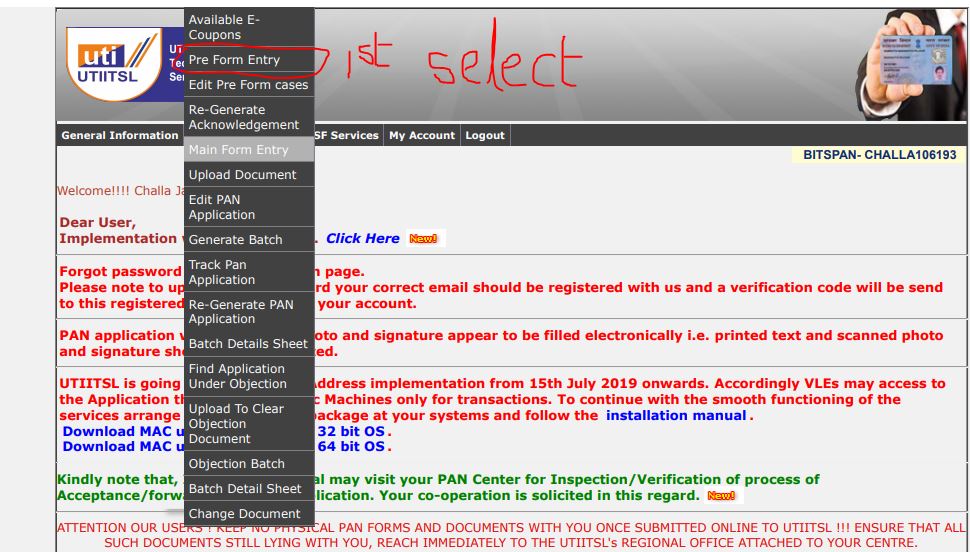
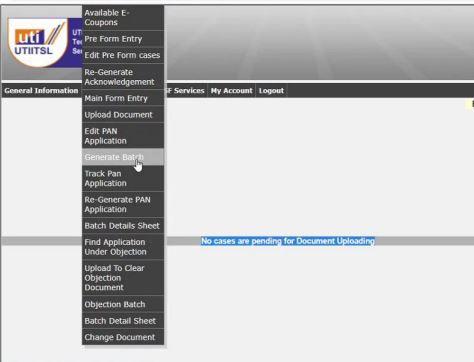
- After Login Select 49A Service
- Now there are total of 5 steps in completing a NEW PAN APPLICATION
- PRE FORM ENTRY
- MAIN FORM ENTRY
- Re Generate PAN APPLICATION
- Upload Documents
- Generate Batch
Note: Before applying for Pan Make sure the customer has Updated Aadhaar , if not there may be some complication on the way , Because Aadhaar is the primary proof For applying pan card. No other documents will be accepted at first , however you can submit other proofs in case only half of the details in Aadhaar are correct, which is known as Demographic matching used by UTI Website to verify a person’s Aadhaar.
Example: if Aadhaar has only DOB year , and the person don’t know the Date and Month you cant use 01/01/1996 . because we don’t know what is their Aadhaar data base. You will be needing a Alternate proofs , or they have to update Their Aadhaar Card.
In some cases you can use 01/01/1996 it may match but it’s not for sure there are 50/50 Chances
Example: in some persons Aadhaar there Name will contain initials in this cases you can’t precede in applications as UTI Website doesn’t allow initials , you need to have alternate proofs for the identity Or update their Aadhaar first in case of no proofs are available,
Name example : Ch jaya kiran (will not be accepted)
Challa Jaya Kiran (will be Accepted)
Same goes for Address also.
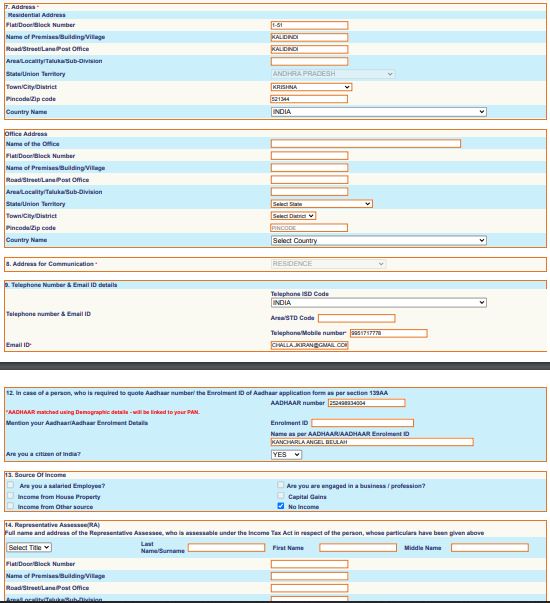
NOW LETS GO TO PRE FORM ENTRY
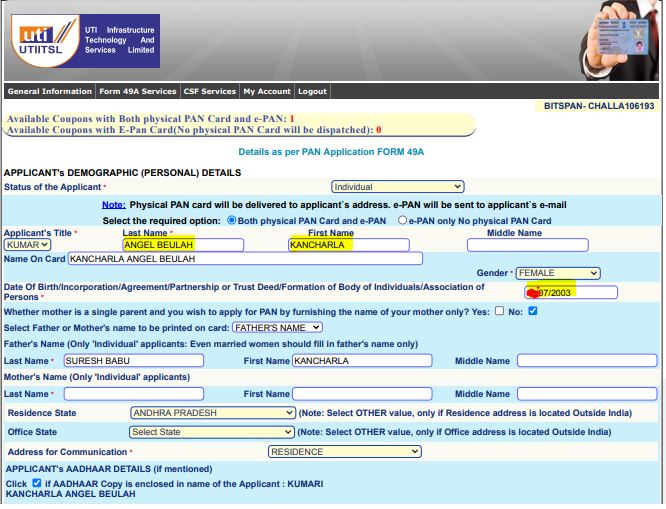
- Select Staus of the Applicant (INDIVIDUAL)
- Select Applicant Title (SMT ,SHRI,KUMARI for Individuals)
(, M/S(FOR FIRMSOR COMPANYS)
- Enter First , Last and Middle Name (as per Aadhaar )
- Now enter name on card here you can choose how your name will be Printed on card
Example : my name is ( challa jaya kiran(
Now I can keep it like ( Ch jaya kiran ) initials will be accepted here
- Select Gender( Male Female or Transgender)
- Now Date Of Birth/Incorporation/Agreement/Partnership or Trust Deed/Formation of Body of Individuals/Association of Persons *
- Whether mother is a single parent and you wish to apply for PAN by furnishing the name of your mother only? Select yes or no
- Select Father or Mother’s name to be printed on card here you can choose whose name will be printed or pan card .
- Enter Father’s Name (Only ‘Individual’ applicants: Even married women should fill in father’s name only)
- Mother’s Name (Only ‘Individual’ applicants) ( optional and only to be enter if applicant has single mother

- Select Residence State Choose your state. (Note: Select OTHER value, only if Residence address is located Outside India)
- Select Office Address . Choose this option only while applying for Firms or Companies Not for Individuals
- Choose Address For Communication Residence(individuals) or Office (Firms)
- APPLICANT’s AADHAAR DETAILS (if mentioned) Click if AADHAAR Copy is enclosed in name of the Applicant : Challa jaya kiran tick the box if you have Aadhaar of the applicant
- AADHAAR No. (as mentioned in Applicant’s AADHAAR Copy) Enter Aadhaar number
- Click Check Aadhaar and re enter your aadhaar number. This will verify the Aadhaar data base , and will inform you if the applicant has PAN CARD IN THEIR NAME. if there is no pan card on the applicant name you will be able to proceed.
- If the Applicant doesn’t have Aadhaar you can apply via Enrollment slip also (leave this step if you Have Aadhaar )
- Click in the box if Enrolment Copy is enclosed in name of the Applicant :
- Now enter Name as per AADHAAR letter/card or as per the Enrolment ID of Aadhaar application form.
- Now you have to Choose
- Identity Proof
- Proof of Address
- Proof of Date of Birth
Note : You can only choose the proofs from the drop down , ask the customers Before hand for alternate proofs, and confirm before you proceed with the application.
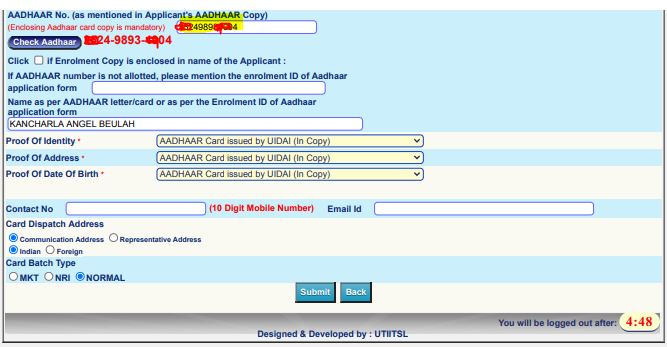
- Now enter Contact number
- Now enter email id
- Now choose Card Dispatch address
- Choose communication address if you want the Card to the Dispatched to the Applicant address .
- Choose Representative Address . this is for Minor Application and whoever want there card to be dispatched to their Friends or family members addresses
- Choose where the card will be dispatched , india or Foreign
- Now select Card Batch type
- Normal for indian , NRI for Foreign
- And now submit
- If all the Details are correct as per Aadhaar , You will receive an Acknowledgement Receipt
- Here you will allotted Application number or Coupon number. You may proceed to next step which is MAIN FORM
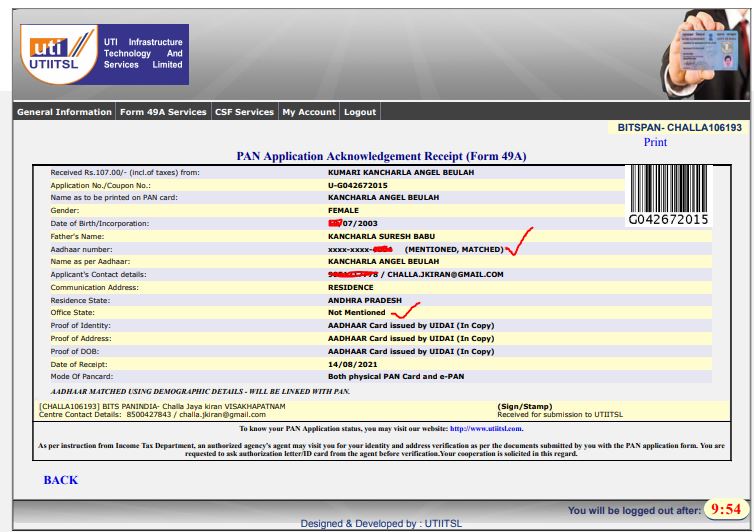
In case of Partial match cases and wrong entries read the acknowledgement,
- If the Details provided are incorrect after you have clicked submit it will ask you if the applicant has given biometric consent to UTI for verifiying the details with Aadhaar website.
- Click yes if you click no the application will be stopped here
- After clicking yes it will ask if you have Bio-metic device , here you will have option of immediate or later ,
- Click immediate and take Applicant bio metrics only then the application will be processed if you click later the application will be on hold until you take biometics of the person.
- You edit preform using Edit preform cases option in 49A Service.
- After clicking EDIT PREFORM select the date you have started the application or enter coupon number. The application will display then click on it edit the options or wrong entries or click update in case of bio metric authentication. After this steps of corrections in preform another acknowledgement will be generated. Look down on the Acknowledgement and see if has showm Aadhaar matched comment , if this comes you can proceed with the application, if it is still not matched you have to edit again and see,
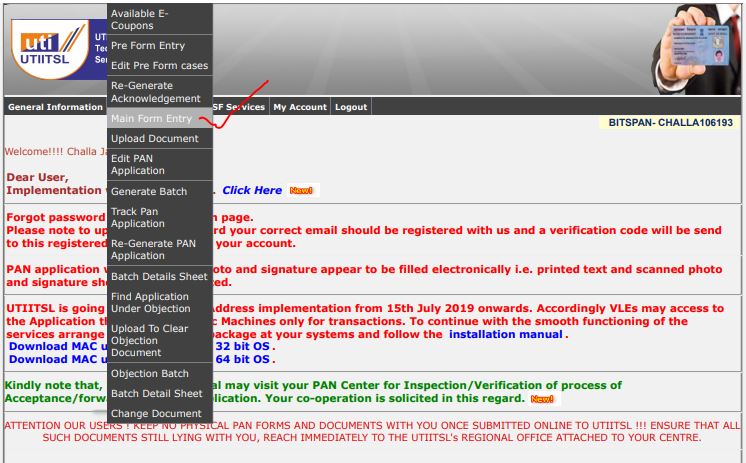
NOW MAIN FORM ENTRY
- Click main form in 49 A Service if you have submitted the preform Entry Successfully
- After clicking the main main form.
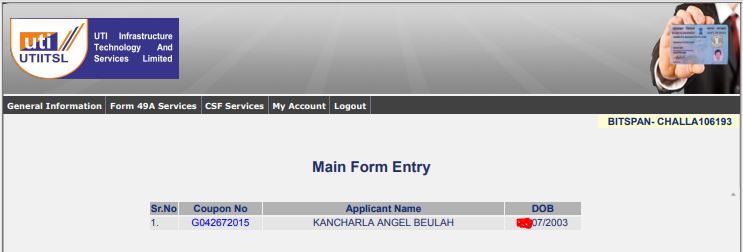
- Your application will be Displayed along with coupon number , Applicant name and DOB
- Click on the application number
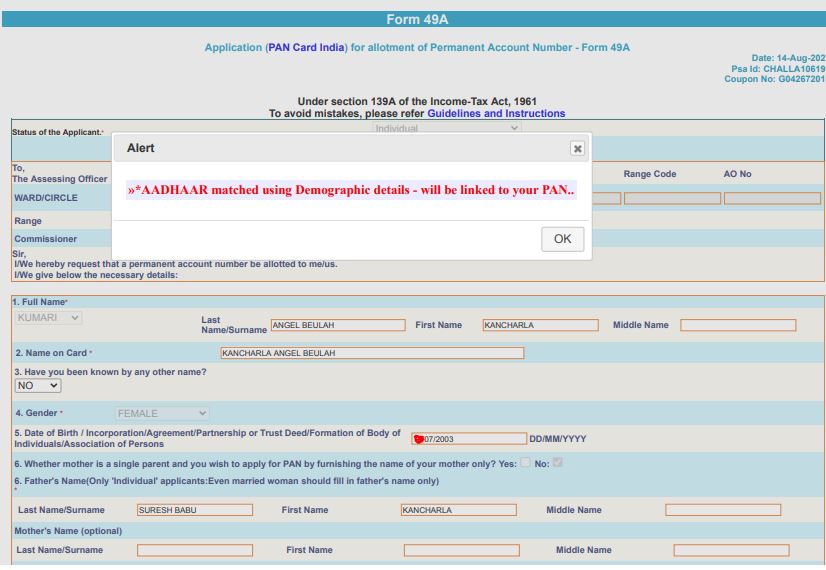
- A message will pop up »*AADHAAR matched using Demographic details – will be linked to your PAN.. “ no need to worry it just says that the Details you have provided as per your Aadhaar will be linked to your PAN CARD. JUST CLICK OK
- Follow Steps carefully From here
- Leave the 1st slot which says To the Assessing Officer because they will be fetched automatically
- In the main form you just need to provide very few details as most of the details will be fetched from the PREFORM entry , like NAME ,DOB , FATHER NAME ,GENDER
- Go to the number 7 slot which is Address , fill the slot with the communication address, don’t use any type of .,- in the address box.
- Enter Office address if you have selected office state in preform entry, if you have not selected leave it.
- Now go to 9 step and enter mobile number and email id
- Now go to 13th step which is source of income , choose no income for individuals who are not employees , Choose other option Depending on applicants
- Now 14th Step which is Representative Assesse (RA) enter this address if you have selected this option in PREFORM ENTRY ,Applicable incase of minor applications and Pan card to be Dispatched to relatives address or Friends
- Now 16th for individuals click HIM SELF / HERSELF in case of minors choose REPRESENTAIVE ASSESSEE
- Click on Verifier name the name will automatically appear here don’t enter any thing
- Now Verification place , Enter the Place(Village , City ,) where you are applying the PANCARD from
- Now click submit
- Another Pop up will come : Suggested AO DETAILS , Just click ok here don’t change anything
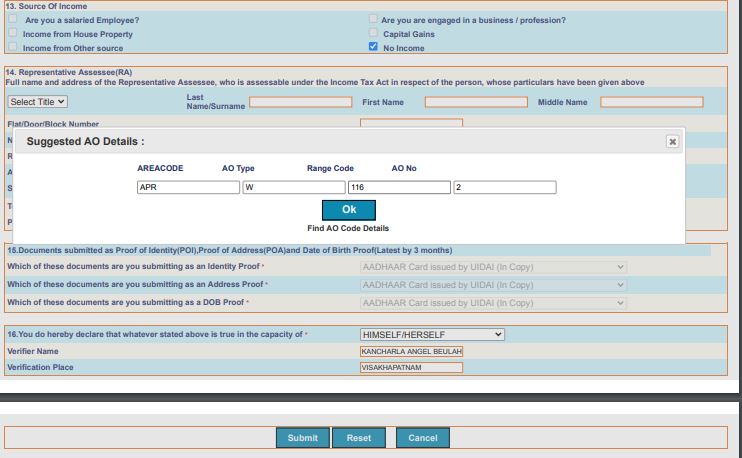
This details Fetched automatically From income tax department
- Now it will show application has validated successfully,
- An online FILLED Application will be Displayed , for you to take print out
- After this is displayed the application you will be able to go next step which is UPLOAD DOCUMENTS
- If the application was not displayed in UPLOAD DOCUMENT option go back to Mainform entry and see if the application is processed, if there is server issue you need to do the main form again and submit again, Happens in rare cases.
- If you don’t find in MAINFORM and still its not showing in UPLOAD DOCUMENTS , LOG OUT FROM PORTAL AND LOGIN AGAIN or wait for some time they will appear because the server may be slow.
Re generate PAN Application:
- Use this process only if you are not able to get the Application Printout After the MAINFORM
- Go to Re generate pan application in 49A Service ,
- Enter the Coupon number
- And click submit you browser will load and the application will be displayed in another tab.
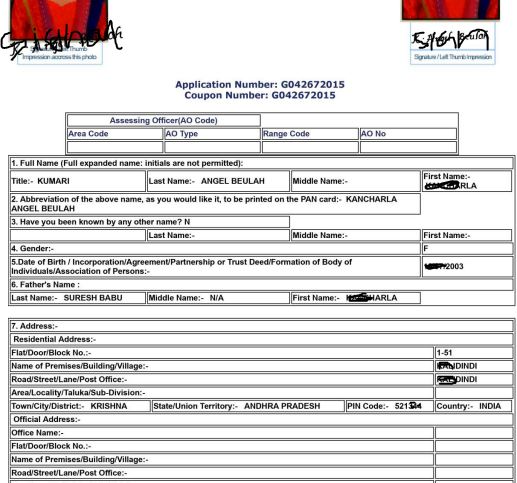
HOW TO FILL THE APPLICATION (Sign with BLACK INK)
- You need to take 3 Signatures and paste 2 Recent Passport Size photographs
- On left hand side Photo Box paste the photo and the applicant has to keep sign across the photograph
- On the right hand side the applicant has to sign inside the box Below the Photograph
- And the 3rd signature is at the Bottom of the page along with DATE
HOW TO FILL THE APPLICATION (THUMB IMPRESSIONS)
- Same process but in place of the Signatures Take the Thumb Impressions
- But this application will not be accepted if uploaded like this
- The application must be Attested by an Gazzette Officer
HOW TO PREPARE FOR DOCUMENT UPLOAD
- Take printout of the application and paste photos and take signatures
- SCAN THE APPLICATION along with the proofs (AADHAAR , and OTHER PROOFS if selected other than Aadhaar ) which we have selected with minimum 300DPI RESOLUTION in JPEG FORMAT
- SCAN THE AADHAAR CARD OF In cases of minor Father Aaadhar is needed and representative the concerned person Aadhaar is also needed for the card to be dispatched to their addresses
- And SCAN photo and Signature Seperatly
- Now Go to Google and type JPEG TO PDF CONVERTER
- Choose any website and choose upload
- Here upload PAN APPLICATION , AADHAAR AND OTHER PROOFS
- And click convert all single images will be merged to PDF and download it
- Now go to www.digisevapay.utiindia .com
- And select the Photo and sign cropping tool
- Here upload the photo and signature and click GET PHOTO AND SIGNATURE
- This will help you Crop the PHOT AND SIGNATURE using this will help you convert the photo and signatures to the UTI SPECIFICATION so you will not have any Troubles in uploading Documents.
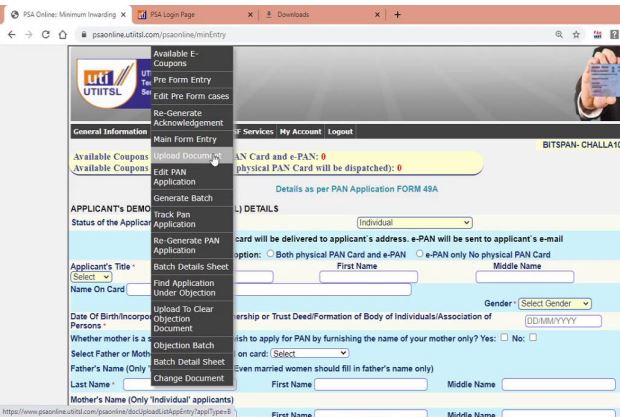
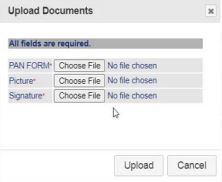
NOW UPLOADING DOCUMENTS.
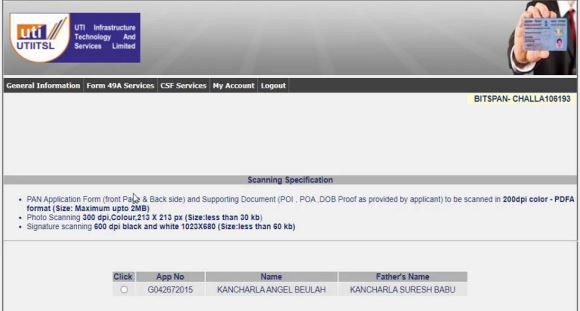
- Go to UPLOAD DOCUMENTS in 49A Service Choose your Application Number
- Every documents have there own Specification, you need to upload as per them
- It show you 3 options which are PAN FORM , PHOTO AND SIGNATURE
- Now if you have followed above steps you will have panform with all Documents in a single pdf and signature and photos Cropped to uti specification
- Now Click on PAN FORM TO UPLOAD the PDF with Application and Documents
- Select Photo and Upload Photo
- Select Signature and Upload the Signature
- And Click Sumit
- And NOW it will Show Documents uploaded Sucessfully
- Now you cant change Documents once uploaded so please be careful
- Now you can Proceed to NEXT STEP WHICH IS GENERATE BATCH
Note : if you have more Application Complete them and Upload the Document and at the end of the day go to generate batch
GENERATE BATCH
Click Generate Batch in 49 A service you have to use this because all you did until now is under your UTI ID , by using this process the application will be uploaded to the income tax website , if you miss this the application will stay in you id

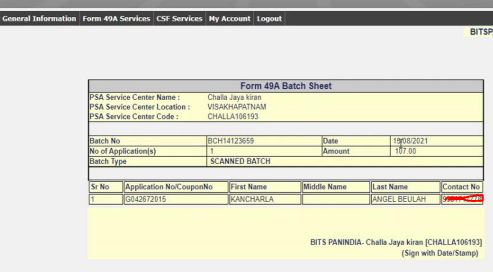
Click on the Generate batch and the Application and or Select all application if you have multiple application and click generate batch , after submission you will a get a batch sheet save it for future reference,
By doing all this steps Correctly you will have no problem in pan allotment,
Pan card allotment will takes 2-4 Days. In some cases with alternate proofs validations take timeand it may get delayed Card will be Dipatched in 7Days,
USE TRACK PAN OPTION FROM 49A Service Track Application After 2 days of applying date For getting Correct information and after that track every 2 days on Regualar intervals to look for objection, or any issues
visit for more information click here
This is the Full Process of NEW PAN AND MINOR PAN

Best Investment Money Return Plan

How to Install Bio metric Drivers in Digi Seva Pay

How to Get Digi Seva Pay Customer Service Point
About Author
Asset Mantra
Iam "Asset Mantra"youtube channel Creator and will provide Small and Best Business Ideas and guidance to success your business in easy way. follow my youtube channel and watsapp groups for more updates and guidance.